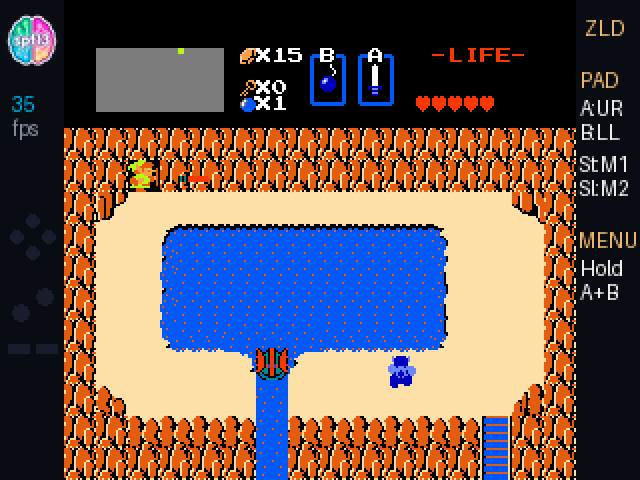
Zelda on a Conference Badge
As one of the GitHub Stars and a member of the GitHub Creators program, I got a package a few days before GitHub Universe: my conference badge, early, with a little note card tucked in that said hack this. As soon as I …
以下正文同步自 Hacker News 最新,版权归原站所有,已转换为易读排版。
As one of the GitHub Stars and a member of the GitHub Creators program, I got a package a few days before GitHub Universe: my conference badge, early, with a little note card tucked in that said hack this. As soon as I saw it I thought — man, this has a game controller on it, and it’s kind of perfect. Hanging from a lanyard around your neck, you can just grab it, hold it up, and play. I wonder if I can get The Legend of Zelda on it.
So I backed up the flash, mounted the filesystem, and verified the restore came back clean — the whole badge is recoverable from USB, which is why every experiment below ships as F:\apps\nes you can delete if you want every byte back. With that safety net I started working out how much of the badge I’d have to give up.
This year’s badge is called Badger, and it’s a nice piece of hardware: an RP2350 (dual-core ARM Cortex-M33 running at 230 MHz), a 320×240 IPS panel, 16 MB of QSPI flash with about 9.76 MB free for user apps out of the box, 8 MB of QSPI PSRAM, an accelerometer, Bluetooth Low Energy, and an infrared transceiver.
It runs MonaOS 4.0, a custom MicroPython environment with hardware-accelerated graphics primitives (badgeware), a dual-core software 3D rasterizer (pico3d), and LED control (sparkle).
The obvious approach is to flash a bare-metal C NES emulator as a .uf2 image. That takes about twenty minutes, and it works. It also turns the badge into a Nintendo emulator that used to be a badge which ruins the entire point.
You lose MonaOS: the BLE contact exchange, the venue IR scavenger hunt, the two-player games, the tilt-controlled 3D Mona launcher. All of it.
I didn’t want a dedicated emulator. I wanted Zelda, Super Mario Bros., and Tetris to be an ordinary app inside MonaOS, sitting at /apps/nes, launching from the carousel, and dropping back to the OS when you tap the HOME pad on the back.
Which means running inside MicroPython. And running an NES inside an interpreted language on a microcontroller runs into serious performance issues. I love a challenge like this.
Standard MicroPython bytecode manages somewhere around 100,000–200,000 interpreted opcodes per second on a Cortex-M33. Full-speed NES needs roughly ten times that.
Writing a native C .mpy module was an option but not one I was really interested in. Custom dynamic native modules on MicroPython are an ABI and symbol-matching gamble against a vendor firmware image. It just felt too risky and fragile of an option. If it breaks on someone else’s badge, it breaks in a way they can’t fix.
So with a healthy amount of curiosity and with Gemini 4 Argon we went to work. The model drafted the inner loops from prompts describing the 6502, PPU, and mapper contracts — instruction decode, sprite evaluation, and bank switching. I set the four-pointer architecture around st, mem, fb, and fpal, shaped the Viper kernels, and measured every number below on hardware over USB serial. The remaining bugs (viper:8004, __aeabi_idivmod calls, the frame budget) are the kind you only get from running it.
Other pure-Python NES emulators I tried allocate objects on every instruction and ran at less than half a frame per second on the badge in my quick test. So Gemini and I built our own NES emulator from scratch (apps/nes/emu.py, ~1,100 lines): a custom 6502 CPU core, scanline PPU renderer, and Mapper 0 (NROM), Mapper 1 (MMC1), Mapper 2 (UxROM), and Mapper 3 (CNROM) bank switcher engineered specifically around RP2350 @micropython.viper.
The thing that makes this possible is @micropython.viper.
Regular MicroPython, and even @micropython.native, still dispatches through the object model. Viper doesn’t. It compiles typed Python syntax directly into raw ARM Thumb-2 instructions at import time, and it works on unboxed values: machine-word integers and raw pointers (ptr8, ptr16, ptr32).
So when you dereference ptr8[offset], you get a single 16-bit Thumb-2 LDRB or STRB. No heap allocation, no dictionary lookups, no garbage collector pressure.
@micropython.viper def apply_scanlines_16(fb: ptr16, start_row: int, height: int, width: int): for y in range(start_row, start_row + height, 2): row: int = y * 320 + 32 for x in range(width): idx: int = row + x val: int = int(fb[idx]) fb[idx] = (val >> 1) & 0x7BEF # 50% RGB565 luminance attenuation
That one decorator closes most of the performance gap. The catch is that Viper comes with some fairly unforgiving constraints.
Writing non-trivial emulation in Viper means living with the ARM Architecture Procedure Call Standard:
So we packed CPU work RAM, OAM, palette RAM, VRAM, and the cartridge save window into a single contiguous 32 KB bytearray ($0000–$7FFF in the emulator, with PRG ROM banked in separately):
The badge has no speaker, so there is no APU, and $4000–$4017 isn’t emulated — this is a picture-only port.
The emulator’s own registers (program counter, accumulator, X, Y, stack pointer, status flags, cycle counters, PPU latches, MMC1 shift registers) all live in a 64-element 32-bit integer array (st).
Four pointers (st: ptr32, mem: ptr8, fb: ptr16, fpal: ptr16) are enough for the entire 6502 core and PPU to run without spilling.
The panel runs in 16-bit RGB565. MonaOS exposes the underlying buffer as screen.raw.
Rather than rendering into an intermediate frame buffer and paying for a full-screen blit, the PPU scanline renderer writes directly into display memory:
@micropython.viper def render_bg_16(st: ptr32, mem: ptr8, fb: ptr16, fpal: ptr16): if not (st[REG_PPU_MASK] & 0x08): c: int = int(fpal[0]) for y in range(240): row_c: int = y * 320 + 32 for x in range(256): fb[row_c + x] = c return
Scanline tile fetch and bitplane unpack directly to fb[y * 320 + 32 + x]
...
The NES screen is 256 pixels wide and the badge is 320, so centering it leaves a 32-pixel gutter on each side.
Leaving that dark seemed like a waste. The left gutter now carries the spf13 labs mark, a live FPS counter (around 32 FPS in Zelda in this post-optimized build with the sidebar and HUD), and a controller input visualizer. The right gutter has the button mapping and a SAV indicator that lights up whenever battery SRAM hits the disk.
When the badge hangs from a lanyard, the 8-channel CAP1208 capacitive controller (badge.pad) sits at the top of the board, above the screen. Genius design. It means you can grab the badge, keep the lanyard around your neck and play it like a gameboy as you rotate it 180° and the touch array lands under your thumbs, which is exactly where a handheld wants it. The only issue is the badge’s orientation is now inverted, so the logical mapping of the D-pad and action buttons is upside-down. The fix is simple:
The first build that actually booted Zelda on hardware gave us 72.9 ms per frame: 31.9 ms in the 6502 core and 41.0 ms in the PPU renderer. That is 13.7 FPS, about 22% of real-time NES speed. Ok. This is awesome. We got it working, Zelda on my conference badge. Once running the next goal was to make it playable. Four changes took 49 ms off every frame, a 3.1× speedup, down to 23.7 ms in Zelda (about 42 FPS) and 10.9 ms of work per frame in Tetris:
A tight read loop used for timing rather than waiting can skip cycles it needed. That is why the compatibility list below is fourteen titles I actually played rather than a claim of universal NES support — the mapper set and optimization are tuned to those. I’m sure other titles play and I’m sure some don’t. The emulator is open source, so you can try your own ROMs and see what works and since we live in the age of agents, have them help patch it for your favorite NES game.
Zelda uses battery-backed RAM at $6000–$7FFF to persist quest data (only when you die or open the save screen), while Metroid saves by password; Final Fantasy and Dragon Warrior also rely on battery-backed saves. Most NES classics (Super Mario Bros., Tetris, Contra, Castlevania, Mega Man 2) have no battery-backed save at all.
Because the entire machine state is a 256-byte register array (self.st) plus one contiguous bytearray (self.mem), full save states were nearly free to add. They sit next to the battery SRAM image on the badge’s LittleFS partition, as /state/nes_<slug>.state and /state/nes_<slug>.sav. One more caveat: the save inherits the write risk — back up anything you care about over USB, or let’s be honest, if you care about it don’t do it on a conference badge. The 60-second auto-save timer is deliberately lazy to be gentle on flash.
[STA] in the ROM list means a save-state file was found for that title — the list’s marker for “there’s a restore here.”
Turn-based RPGs and handheld classics are a natural fit for a lanyard badge you carry between conference sessions. Alongside action staples (The Legend of Zelda, Super Mario Bros., Tetris, Contra, Castlevania, Mega Man 2, Metroid, Donkey Kong Classics, Pac-Man, Galaga, Excitebike, Dr. Mario), we added full MMC1 + battery SRAM + instant save state profiles for Final Fantasy (ff1.nes) and Dragon Warrior (dw1.nes).
The NES emulator (apps/nes) and the Hardware Lab (apps/hacker) are open source:
github.com/spf13/universe-2026-badge-hacks
Mount the badge as USB storage. Plug it in over USB-C and launch the USB Disk (mass_storage) app from the MonaOS menu. It shows up as a removable drive (F:\ on Windows, /Volumes/BADGER on macOS).
git clone https://github.com/spf13/universe-2026-badge-hacks.git cd universe-2026-badge-hacks cp -R apps/nes /Volumes/BADGER/apps/
If /Volumes/BADGER/apps doesn't exist yet:
mkdir -p /Volumes/BADGER/apps && cp -R apps/nes /Volumes/BADGER/apps/
Badge not at /Volumes/BADGER? Run ls /Volumes to find it — some Macs mount it as BADGER or RP2350.
git clone https://github.com/spf13/universe-2026-badge-hacks.git cd universe-2026-badge-hacks Copy-Item -Recurse -Force .\apps\nes F:\apps\
Drive letter varies — check File Explorer if F:\ doesn’t exist.
Add your own ROMs that you’ve dumped yourself and legally obtained. No ROMs are included or linked:
Eject & play. Safely eject the drive (macOS: right-click → Eject or diskutil eject /Volumes/BADGER; Windows: system tray → Safely Remove), pick NES from the MonaOS menu, turn the badge upside-down so the capacitive pad sits under your thumbs, and go.
Conference badges used to be glorified flashing name tags. Today they’re dual-core ARM computers that compile native machine code at import time, and the interesting part of this project was finding out how far that actually gets you. Today it’s far enough for a playable NES.
If you’re heading to GitHub Universe 2026, I look forward to seeing you there. Just remember to save your game before the keynote.
(Since it felt like a Game Boy I then wondered if I could get it to run Game Boy Color games too. See the follow-up post: Game Boy Color on My Conference Badge.)
正文由 探How 从来源站点 RSS 同步,内容未经改写;遇到排版缺失或需要图片、视频时请以原文为准。